Introduction: How To Decorate Kitchen Counters Without Clutter
If you want to decorate kitchen counters without clutter, the answer isn’t buying more storage bins or doing a full renovation — it’s understanding one simple thing: most cluttered counters aren’t a quantity problem. They’re an arrangement problem.
The knife block that’s been sitting in the same corner since 2019. The fruit bowl that somehow migrated from the table. The random collection of cooking oils, spice jars, paper towel holders, and charger cables that have quietly colonized every square inch of usable surface — until your kitchen feels less like a home and more like a very anxious storage unit.
I’ve been there. And what makes it tricky is that the advice you’ll usually find online is either too vague (“just keep it minimal!”) or too aspirational (here’s a $4,000 renovation that will solve all your problems). Neither is actually helpful.
This guide is different. I’m going to give you a real, step-by-step formula for decorating kitchen counters so they look intentional, styled, and genuinely beautiful — without tipping into cluttered, chaotic, or cold. Whether you’re working with a tiny apartment kitchen or a full U-shaped layout, this approach adapts to your space.
Let’s get into it.
Why It’s So Hard to Decorate Kitchen Counters Without Clutter
Before we talk solutions, it helps to understand the problem. Kitchen counters are one of the most functionally demanding surfaces in your home. Unlike a living room shelf or a bedroom dresser, your counters have to do real work — they hold appliances, prep food, stage dishes, and somehow remain accessible at all times.
That dual nature (functional AND decorative) is what makes them so tricky to style. You can’t just clear everything off and place three pretty objects like you would on a coffee table. But you also can’t just pile everything on and call it “rustic charm.”
The “Decorative vs. Functional” Tension
Interior designers talk about this a lot, and for good reason. Every object on your counter is either earning its place functionally, decoratively, or both. Anything that doesn’t earn its place in at least one of those categories is clutter.
The goal isn’t to eliminate functional items — your coffee maker earns its place every morning. The goal is to make your functional items look intentional and surround them with a few carefully chosen decorative pieces that elevate the whole counter.
The Real Reason Counters Look Cluttered
It’s almost never about having too many things. It’s about having too many things at the same visual height with no grouping, no breathing room, and no focal point.
Think about a shelf that’s been styled well versus one that’s crammed full. The styled shelf has things grouped together, varied heights, and clear negative space between clusters. The crammed one has items placed wherever they fit, all competing for attention at the same level.
Your counters work the same way. Fix the arrangement and you often don’t even need to remove anything.
Step One: The Edit (What Actually Has to Stay)
Before you can decorate anything, you need a clear surface to work with. And that starts with an honest edit.
I’ll be direct: most of us have about twice as many things on our counters as we actually need there. The rule I use — and it genuinely works — is called the 72-hour rule. For every item currently on your counter, ask: did I use or touch this in the last 72 hours?
If the answer is no, it doesn’t belong on the counter. It might belong in a cabinet, a drawer, the pantry, or (let’s be real) the donation pile.
What Earns a Permanent Counter Spot
Not every item that passes the 72-hour test deserves a permanent counter spot. After the initial edit, run each remaining item through this second filter:
Keep on the counter if:
- It’s used daily and requires counter access to function (coffee maker, toaster, electric kettle)
- It’s too heavy or large to store elsewhere realistically (a heavy stand mixer)
- It actively contributes to the look you’re going for (a beautiful olive oil bottle, a ceramic canister set you love)
Move off the counter if:
- It’s used 2–3 times per week and is lightweight (hand mixer, waffle maker)
- It’s functional but ugly and can be stored out of sight
- It’s been there “temporarily” for more than two weeks
The Appliance Audit
Appliances deserve their own audit because they take up the most space. Here’s my honest take: most kitchens only truly need two or three appliances on the counter at a time. Everything else should have a cabinet home.
If you use your air fryer daily, it stays. If you use your blender once a week for smoothies, it goes in a lower cabinet where it’s still accessible but not consuming prime counter real estate.
This one step alone will transform how your kitchen looks — often more than any decorative purchase you could make.
If you have a small kitchen and need smarter ways to use every inch, my guide on small apartment living room ideas covers the same zone-based organization thinking that works brilliantly in compact kitchen spaces too.
Step Two: How to Decorate Kitchen Counters Without Clutter — The Grouping Formula

Once you have your edited surface, it’s time to style what’s left. This is where most people either freeze up or go overboard. The secret is a framework called the Rule of Three with Height Variation.
The Rule of Three
Group objects in odd numbers — threes especially. A single object on a counter looks forgotten. Two objects look like they’re waiting for a third. Three objects create a visual story, a finished vignette that the eye reads as intentional.
This doesn’t mean you can only have three things. It means you create clusters of three (or five, or seven) with clear negative space between them. Two clusters of three feels curated. Fourteen objects scattered across a counter feels chaotic.
Height Variation Within Each Group
Within each cluster, aim for at least two different heights — ideally three. A tall object, a medium object, and something low. This creates visual rhythm and keeps the eye moving naturally across the surface.
Example cluster:
- Tall: a wooden utensil holder (or a potted herb plant)
- Medium: a ceramic canister or a small cookbook propped open
- Low: a small tray holding a few olive oil bottles or a pretty dish
That three-item group takes up the same amount of space as three randomly placed items, but it reads as completely different. Grouped = styled. Scattered = cluttered.
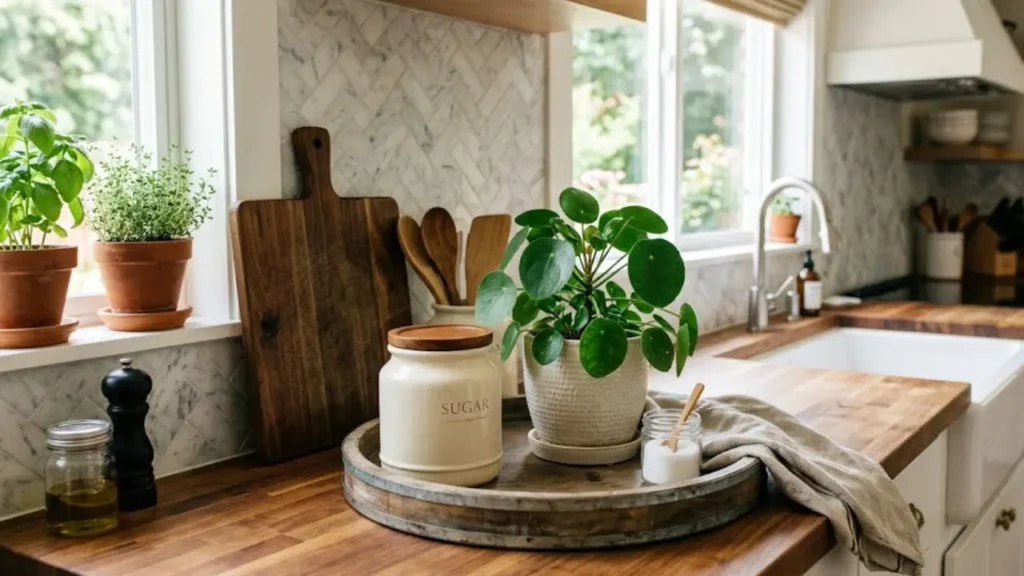
The Tray Trick (Seriously, Use Trays)
This one is underrated. A tray does something visually powerful: it defines a zone. When you place objects on a tray, your brain reads them as a single unit rather than multiple separate objects. This is why a tray with four things on it looks tidier than those same four things placed directly on the counter.
Use a tray to:
- Corral oils, vinegars, and a salt cellar near the stove
- Create a “coffee station” that keeps mugs, sugar, and a small plant organized
- Group a candle, a small plant, and a pretty soap dispenser near the sink
A marble or slate tray works beautifully for kitchen counter styling — it adds a touch of elegance without feeling precious. A wooden cutting board propped against the backsplash doubles as both functional and decorative.
Step Three: Choosing What to Put on Kitchen Counters for Actual Visual Impact
Here’s where I see people make the biggest mistake: they buy “decor” that doesn’t feel cohesive with anything else in their kitchen. A random farmhouse sign next to a modern faucet next to a colorful fruit bowl — everything competing, nothing connecting.
The items you choose for decorative purposes should do three things: relate to each other in color or material, connect to the broader aesthetic of your kitchen, and serve at least a partial function (even if that function is just “looks beautiful”).
The Color Connection Rule
Pick one color or material family and repeat it across your counter clusters. It doesn’t have to be matchy-matchy — it just needs to feel intentional.
If your kitchen has warm wood tones, bring in wooden accents (a cutting board, a wooden utensil holder, wood-handled tools). If you have a more modern kitchen with cool-toned hardware, lean into matte ceramics, concrete textures, or clear glass.
Personally, I love the combination of natural textures — linen, terracotta, unfinished wood — because they work in almost any kitchen and age beautifully. They also photograph really well for Pinterest, which matters if you want your kitchen to feel magazine-worthy.
Plants and Greenery: The Easiest Counter Upgrade
If you do nothing else from this guide, add a plant to your kitchen counter. Even a small pot of basil or a trailing pothos clipping in a glass jar adds a quality that no decorative object can replicate: life.
Greenery does several things at once — it softens hard surfaces, adds color, brings the eye to a natural focal point, and makes a space feel less sterile. And kitchen windowsills are often perfect growing spots for herbs, meaning your plant is genuinely functional too.
Good options for kitchen counters:
- Potted basil or rosemary — functional and fragrant
- A small succulent — low maintenance, visually clean
- Trailing pothos in a ceramic pot — beautiful even without a window
- A single stem in a bud vase — minimal, elegant, changed seasonally
If you’re decorating a smaller kitchen and want ideas on making the whole space feel more layered and intentional, the same principles I covered in my guide on making a rental apartment feel like home apply directly to kitchen spaces — especially the part about creating zones that feel deliberate.
Practical Decorative Objects That Pull Double Duty
The best kitchen counter decor items are ones that are both beautiful AND useful. Here are my favorites:
A beautiful olive oil bottle or cruet set — Upgrade from the plastic bottle and use a glass or ceramic bottle instead. The difference in how it reads on your counter is immediate.
A ceramic canister set — Store coffee, sugar, or flour in matching canisters instead of their original packaging. This alone makes a counter look 10x more styled.
A wooden or marble mortar and pestle — Used occasionally, but beautiful full-time.
A cookbook, propped open — Prop a cookbook you actually use against your backsplash. It adds height, color, and a personal touch.
A decorative colander — If you have a colander you love, don’t hide it. A beautiful enamel or woven colander displayed casually near the sink reads as thoughtful styling.
Step Four: Negative Space is the Real Decorator
I want to spend a full section on this because it’s the thing nobody talks about enough: negative space is not wasted space. Empty counter areas are not areas that need to be filled. They are the breathing room that makes everything else look intentional.
This is the single biggest mindset shift in styled counters versus cluttered ones.
How Much Counter Should Be Clear?
A good rule of thumb: aim for at least 40% of your counter surface to be clear at any given time. This feels like a lot if you’re used to a packed counter, but once you try it, the difference is immediately obvious. Your kitchen looks bigger, calmer, and more purposeful.
The clear areas also serve a practical function — they’re where you prep food, set down groceries, and actually use your kitchen. When counters are packed wall to wall, you lose your functional workspace, which makes the kitchen feel stressful to be in.
Creating Intentional Empty Zones
Rather than leaving random patches of clearness scattered around, create deliberate “landing zones” — clear stretches of counter that live next to your main work areas. The stretch next to your stove should be clear for hot pots. The stretch next to your sink should be clear for dish staging.
Your decor clusters live at the ends of your counters, against the backsplash, or in corners — not interrupting your workflow zones.
Step Five: Styling by Kitchen Type
The formula above works universally, but the application changes depending on your kitchen layout. Let me break it down for the three most common situations.
Small or Galley Kitchen Counters
In a small kitchen, the counter space is sacred. Every item has to earn its place even harder. With less surface area, the Rule of Three becomes a Rule of One Cluster — you have room for one beautifully styled vignette, and everything else needs to be ruthlessly functional.
For small kitchens, I’d focus on:
- One appliance only (your most-used one)
- One cluster (a tray with your coffee station, or a plant + canister + oil bottle grouping)
- Everything else in cabinets or wall-mounted
Vertical space becomes important here too — a magnetic knife strip on the wall, wall-mounted shelves above the counter, or hooks inside cabinet doors all free up surface space for actual countertop styling.
If you’ve been working with a tiny space and want more transformation ideas, my article on before and after small space changes has some of the most dramatic examples of what’s possible without a renovation.
L-Shaped or U-Shaped Kitchen Counters
More counter space is actually harder to style than less, because there are more decisions to make. The mistake people make in larger kitchens is spreading everything out across the whole surface — which just creates a wider version of clutter.
Instead, treat each counter “run” as its own zone with its own vignette. The peninsula or island gets one cluster. The stretch by the stove gets one functional zone. The counter near the window gets a plant moment.
Think of it as three small styled vignettes rather than one large decorating project.
Kitchen Counter Near a Window
A window changes everything. It’s an automatic focal point, and it brings in natural light that makes any decor look better. If you have counter space near a window, prioritize it — this is where your most beautiful items go.
Near a window:
- Herbs or a small plant for the light and visual appeal
- A beautiful glass jar or vase (the light will catch it)
- Your most visually interesting functional piece (a ceramic kettle, a pretty dish rack)
Keep the area directly in front of the window clear if possible — blocking the light negates the whole advantage of having a window counter.
Step Six: Products Worth Considering for Styled Kitchen Counters
Disclosure: This post contains affiliate links. If you purchase through them, I may earn a small commission at no extra cost to you.
I’m selective about what I recommend here because I genuinely believe that buying the right three items beats buying fifteen random things. These are the categories worth investing in for lasting counter style.
A Ceramic Canister Set
Matching canisters are the single highest-impact purchase for kitchen counter styling. They replace the visual noise of mismatched packaging with a cohesive, intentional look.
Look for sets in neutral, matte finishes — cream, sage, terracotta, or slate work in virtually any kitchen. The Sleep & Beyond aesthetic sensibility applies here too: materials that feel natural and tactile, not plasticky or aggressively trendy.
When shopping on Amazon, filter for Best Seller or Amazon’s Choice, check for 4.3+ stars with at least 200 reviews, and look for verified purchase photos — they’ll show you what the canisters actually look like on a real counter versus a studio photo.
A Wooden Serving Board or Tray
A large wooden board (15–18 inches) works as both a counter tray and a functional serving piece. Acacia and walnut are especially beautiful and durable. This is the kind of item that looks better with use — it develops character over time, which you can’t say about many decor pieces.
An Olive Oil Dispenser or Cruet
Decanting your olive oil into a glass or ceramic dispenser is a five-dollar upgrade that makes your counter look considerably more elevated. Many dispensers come with a built-in pour spout and are dishwasher safe, so they’re genuinely practical.
If you’re unsure about sizing or style, check Amazon’s “frequently bought together” for ceramic canister sets — you’ll often find a matching oil dispenser that pulls the whole counter look together.
Expert Tips: What Interior Designers Actually Do
I’ve absorbed a lot of designer advice over the years, and a few insights consistently surprise people who haven’t heard them before.
Designers choose one “hero” object per counter zone. Every well-styled surface has one thing that draws the eye first — a statement canister, a beautiful plant, a sculptural bowl. Everything else supports it. If everything is equally prominent then nothing stands out.
They almost never use matching sets for everything. Matching canisters: yes. Matching everything: too rigid. Designers mix materials — a ceramic canister next to a wooden board next to a brass spoon rest — because variety in material keeps the eye interested.
They edit after styling. A professional will style a counter, step back, look at it for a moment, and almost always remove one thing. The impulse to add more is strong; the discipline to take something away is what separates styled from cluttered — something you can see demonstrated clearly in this real interior design case study showing how professionals make decisive editing choices at every stage. The instinct to add is human; the discipline to remove is trained.
They consider the view from multiple angles. Your kitchen counter is seen from the living room, from the dining area, and while you’re cooking. Style it to look good from the most common vantage points, not just from one angle.
Common Mistakes to Avoid
These are the patterns I see most often — and all of them are fixable.
Styling the whole counter at once instead of in zones. Trying to decorate your entire kitchen counter as one project leads to overwhelm and inconsistency. Tackle one counter zone at a time.
Keeping packaging on the counter. Dish soap in its original bottle, paper towels in the grocery store wrapper, cooking oils in industrial containers — these read as clutter even when they’re tidy. Decant into prettier vessels or at minimum choose products with attractive packaging.
Overusing matching sets. An all-matching kitchen — every canister, every accessory in the same material and finish — can feel sterile. Mix one matching set with some varied individual pieces.
Ignoring the backsplash. Your backsplash is part of the visual composition of your counter. A cookbook propped against it, a small piece of wall art on a ledge, or a mounted plant hooks into this space beautifully.
Decorating before editing. You cannot style your way out of too much stuff. The edit always comes first.
Putting It All Together: Your Counter Styling Checklist
Here’s a quick summary of the formula in action:
- Edit first — Apply the 72-hour rule and the appliance audit
- Clear 40% — Ensure at least 40% of your counter is free
- Create zones — Identify functional zones (prep, coffee, sink) and styling zones (corners, ends, window)
- Apply Rule of Three — Group objects in threes with height variation
- Use a tray — Corral items into defined visual units
- Connect through color/material — Choose one palette and repeat it across clusters
- Add greenery — Even one plant elevates the whole counter
- Add a hero object — Every zone needs one thing that draws the eye
- Step back and remove one thing — Always
The goal isn’t a perfect, untouched counter that looks like a showroom. It’s a counter that looks like someone thoughtful lives there — someone who appreciates beauty and also actually cooks dinner.
Your Kitchen Already Has Good Bones
Here’s what I want you to take away from all of this: you probably don’t need to buy much. The most transformative changes to a kitchen counter are almost always subtractive — removing things, creating breathing room, grouping what’s left.
The decorative layer comes after, and it’s lighter than most people expect. A plant, a tray, a set of canisters, one beautiful object you already own that you’ve been hiding in a cabinet.
Start with the edit. Do that today. Everything else follows naturally, and you’ll be surprised how quickly your counter starts to feel like a space you actually love.
If you want to keep building on this momentum, I’d suggest reading my guide on how to make a small living room look bigger with mirrors — many of the same visual principles (negative space, focal points, height variation) apply when you’re thinking about how rooms connect to each other.
And if you’re dealing with a rental and feel limited by what you can change, don’t miss how to decorate a rental apartment on a budget — there are specific counter-friendly solutions in there that work without putting a single nail in the wall.
FAQ: How To Decorate Kitchen Counters Without Clutter
What should I put on my kitchen counters to make them look nice?
The most impactful items are ones that are both functional and beautiful — a ceramic canister set, a wooden cutting board, an olive oil dispenser in a pretty bottle, and one plant or herb pot. The key is grouping them in clusters of three with varied heights rather than scattering them across the surface. You don’t need many items; you need the right ones placed thoughtfully.
How do I keep my kitchen counters clutter-free every day?
The most effective habit is the 72-hour rule: anything you haven’t touched in 72 hours doesn’t belong on the counter. Beyond that, everything on your counter needs a defined home — a tray, a zone, a specific spot. When things have designated places, they don’t migrate into clutter. A five-minute weekly reset (returning items to their spots and wiping surfaces) keeps counters looking styled without a big effort.
How much counter space should be left clear?
A good target is at least 40% of your counter surface clear at any time. This creates the visual breathing room that makes styled areas read as intentional rather than cluttered, and it preserves functional prep space. If your counters are currently packed, start by clearing everything and only returning what passes the 72-hour and “earns its place” tests.
What do interior designers put on kitchen counters?
Designers typically keep counters sparse but purposeful. They choose one “hero” object per zone (something that draws the eye), group supporting items in threes on a tray, and almost always include at least one natural element — a plant, fresh herbs, or a wooden piece. They also edit more than they add: stepping back and removing one item is a standard part of the process.
How do I style a small kitchen counter when I have no space?
In a small kitchen, the priority is function first, decor second. Aim for one appliance maximum on the counter, and create just one styled cluster — a tray with your coffee station or a plant-plus-canister grouping — rather than trying to decorate the full surface. Use vertical space (wall-mounted shelves, magnetic strips) to move functional items off the counter, which frees up the surface for a small but beautiful styled moment.