There’s a moment every home decorator knows. You’re scrolling Pinterest at midnight, glass of wine in hand, and you see it — a dreamy kitchen with open wooden shelves, neatly stacked white dishes, a small potted herb, and afternoon light filtering through a nearby window. It looks effortless. It looks lived-in but intentional. You think: I need this in my kitchen.
Then comes the hesitation. You’ve also seen the other version — open shelves that became a graveyard for mismatched mugs, old takeout menus, and a bottle of soy sauce you’ve owned since 2019. The difference between those two kitchens isn’t luck. It’s strategy.
I’ve styled open shelves in four different kitchens over the past seven years, and I can tell you with absolute confidence: open shelving done right is one of the most transformative, budget-friendly changes you can make to a kitchen. Done wrong, it creates a permanent mess you have to live with every single day.
This guide covers everything — the best kitchen open shelving ideas by style, how to actually style them, what materials hold up, the honest pros and cons, and when you should probably just keep your cabinets. By the end, you’ll know exactly whether open shelving belongs in your kitchen and exactly how to pull it off.
Is Open Shelving Still “In” Or Is It Over?
Let me answer this directly because I see the question everywhere: yes, open shelving is absolutely still relevant in 2025. The design world has moved away from the stripped-out, “everything on display” maximalist approach from the early 2010s, but open shelves — used thoughtfully — are more popular than ever.
What’s changed is the philosophy. Designers like Joanna Gaines and Emily Henderson pioneered the look by mixing functional kitchenware with decorative objects. That curated, layered approach is now standard. What fell out of favor was the “remove all your upper cabinets and slap up some brackets” mentality without thinking about what actually goes on the shelves.
The modern take is intentional. You keep some closed storage — under the counter, in a pantry, wherever makes sense — and use open shelves strategically for the items that are both functional AND beautiful enough to display. That hybrid approach gives you all the visual benefits without the maintenance nightmare.
Open shelving also adapts to almost any design style. A rustic farmhouse kitchen with reclaimed wood shelves and iron brackets looks completely different from a sleek modern kitchen with white oak floating shelves and no visible hardware — but both are working the same design principle. That versatility is a big part of why the trend has had such staying power.
The short version: open shelving isn’t going anywhere. It just requires more thought than people give it.
The Real Pros and Cons of Kitchen Open Shelving (Honest Version)
Before you start drilling into walls, let’s be real about what you’re actually signing up for.
The Genuine Advantages
It makes small kitchens feel dramatically larger. This is probably the biggest functional benefit and it’s real. Removing bulky upper cabinet doors eliminates visual weight from the walls, which makes the whole room feel more open and airy. If you’ve ever walked into a tiny kitchen and felt like the walls were closing in, this is why — and open shelving fixes it. If you’re dealing with a compact space, also check out these small apartment living room ideas for more tricks that make tight rooms breathe.
Everything you use is actually accessible. No more opening three wrong cabinets to find the colander. Items on open shelves are visible at a glance and reachable in one motion. If you cook frequently, this matters more than you’d think. My morning routine alone got five minutes faster once I switched to open shelves for my everyday dishes.
It forces good organization habits. This is underrated. Closed cabinets let clutter hide indefinitely. Open shelves make bad organization impossible to ignore. Within about two weeks of installing open shelves, I’d gotten rid of four mismatched mugs, two pans I never used, and about fifteen mystery lids. The visibility creates accountability.
It’s significantly cheaper than replacing cabinets. A set of good-quality floating wood shelves runs anywhere from $60 to $250 depending on material and length. Custom cabinetry starts at $150 per linear foot and goes up from there. If you’re renting or working with a tight renovation budget, open shelving gives you a dramatic kitchen update at a fraction of the cost.
You can redecorate seasonally without spending anything. Swap in darker, moodier items in fall. Bring out colorful dishes in summer. Add a small vase of fresh herbs in spring. Your kitchen’s whole personality can shift with just a rearrangement — no painting, no buying new hardware, no commitment.
The Honest Drawbacks
Dust and grease are a constant reality. In a kitchen that sees real cooking — not just reheating — open shelves collect airborne grease faster than you’d expect. Everything within a foot of the stove will have a fine film of cooking residue if you don’t wipe down regularly. I’m talking at least weekly. If you’re a “deep clean once a month” type, this will drive you absolutely mad.
Your kitchen has to look intentional, always. There’s no such thing as “throwing stuff on the shelf for now” when those shelves are visible from your living room. The pressure to keep them styled is real and ongoing. If you’re living with small kids, a busy household, or a partner who considers a stack of Amazon boxes a storage system — open shelving may genuinely not be worth the stress.
You lose some storage volume. Open shelves hold what they hold. Closed upper cabinets are typically deeper and can stack items vertically in ways that open shelves can’t. If you have a lot of stuff — and most of us do — you’ll need a plan for where the less attractive items go before you remove existing storage.
Not everything survives on display. Cast iron skillets, cooking oils near heat, delicate china you own but never use — not everything should live on open shelves. Oils degrade faster near heat and light. Specialty items you rarely touch just become dusty decorations. Be selective.
My honest take: open shelving works beautifully when it’s curated, not comprehensive. The goal isn’t to display everything. It’s to display the things that are worth seeing.
8 Kitchen Open Shelving Ideas by Style
1. Rustic Farmhouse Open Shelves
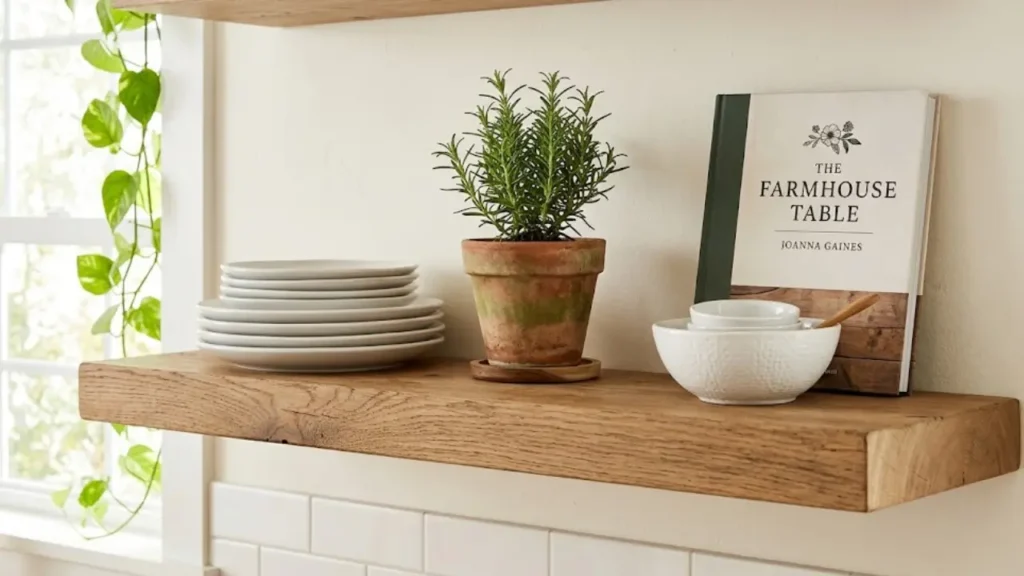
The look: thick reclaimed wood planks, black iron pipe brackets or heavy-duty black metal brackets, white or cream dishware, potted herbs, a few woven baskets tucked in for texture. Maybe a vintage enamel pitcher or a wooden cutting board leaned casually against the wall.
This style works in kitchens with warm tones — cream or white painted walls, butcher block counters, subway tile backsplash. The wood and metal combination reads as both intentional and approachable, which is exactly why Joanna Gaines made it so popular on Fixer Upper.
For the shelf material, look for reclaimed pine or oak that’s been lightly sanded but still shows its grain and imperfections. That texture is the whole point. Standard lumber from a hardware store, stained in a warm walnut or espresso tone, can achieve a similar look for much less money.
A note on brackets: visible brackets are part of the aesthetic here. Don’t be tempted by minimal “floating” hardware if you want the true farmhouse look — the iron hardware is doing real visual work.
2. Modern Minimalist Floating Shelves
The look: sleek, thin shelves (1 to 1.5 inches thick), seamlessly mounted with concealed hardware so the shelf appears to float. Light wood tones — white oak, maple, or birch — or white-painted MDF for an ultra-clean line. Minimal items on display: a small stack of uniform white bowls, one or two glasses, maybe a single trailing plant.
This style demands the most discipline. Every item on the shelf has to be worth looking at. The less you put on these shelves, the better they look. If your kitchen has clean-lined cabinetry, integrated appliances, or a neutral color palette, this approach will feel completely natural.
Concealed shelf brackets (the kind that insert into the wall with internal metal rods) give you the true floating look but require solid studs or wall anchors. Don’t cheap out on mounting hardware here — a floating shelf with heavy dishes needs to be properly secured.
3. Open Shelving with Upper Cabinets Hybrid
This is the approach I recommend most to people who are nervous about going fully open. You keep closed upper cabinets on most of your wall space — for the everyday mess, pantry items, and things you’d rather not look at — and install open shelves in one dedicated section. Flanking a range hood. Running alongside a window. One section of a galley wall.
The result is a kitchen that has the warmth and visual interest of open shelving without requiring you to put everything on display. The closed cabinets handle storage like cabinets always have; the open section is styled more like decor.
This is especially smart in rental kitchens where you can’t remove existing cabinets. You add shelves in the one section where there’s blank wall space, and you get the look without any demolition. If you’re renting and looking for more ways to personalize your space without permanent changes, you’ll find a lot of overlap with what we covered in how to make a rental apartment feel like home.
4. Kitchen Corner Open Shelves
Dead kitchen corners are one of the most universally frustrating design problems. Corner cabinets are awkward, hard to access, and often become where things go to be forgotten. Open corner shelving solves this with style.
Corner floating shelves — the triangular or wraparound variety — turn that unused space into a genuine display moment. A corner shelf arrangement with staggered heights looks architecturally intentional and makes the whole kitchen feel more custom-designed.
Stack cookbooks horizontally on the lower corner shelf. A small succulent or air plant on the upper shelf. Keep it lighter than your main shelves, visually — corners can feel heavy if you overload them.
5. Open Shelves in a Small Kitchen
In a small kitchen, open shelving isn’t just a design choice — it’s genuinely a smart spatial strategy. Eliminating the visual weight of upper cabinet doors can make a room feel 20-30% larger to the eye. Pair that effect with light-reflective shelving material (white, pale wood, light gray) and you have a real transformation on your hands.
The key with small kitchens is keeping the shelves sparse. Less is more here. Three well-placed items per shelf beats six crammed together every time. Use uniform dishware — all white, or matching sets — so the shelves read as organized even when they’re being used for everyday items.
Also consider the height of your shelves. In a small kitchen, mounting shelves higher on the wall (closer to the ceiling) draws the eye up and makes the room feel taller. Leave visual breathing room between shelves rather than stacking them close together.
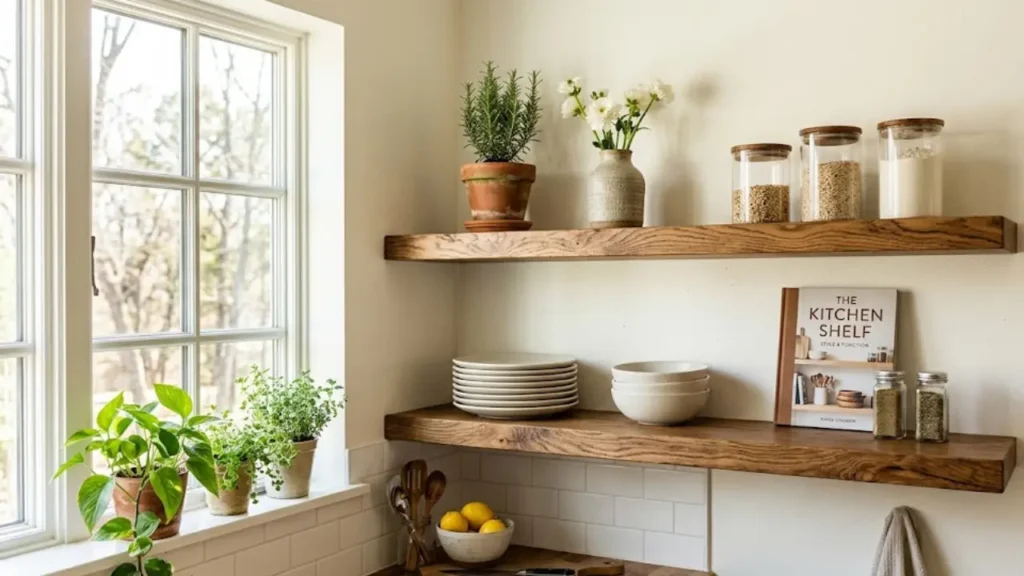
6. Floating Shelves Around a Window
One of my favorite kitchen shelf ideas that most people never consider: flanking your kitchen window with floating shelves instead of blinds or curtains. You get the storage and display space of shelves, you frame the window beautifully, and natural light filters through whatever is on the shelves — herbs, glass bottles, translucent dishes.
Keep the shelves relatively shallow (6-8 inches) so they don’t block too much light. Plants thrive here, obviously. Clear glass items look stunning when backlit. And the whole arrangement gives your kitchen a distinctive, designer-feel focal point that costs maybe $80 in materials.
7. Industrial Open Shelving with Metal Pipes
The pipe shelf look — galvanized or black iron pipes as the support structure, with either wood or metal shelves resting on them — originated in loft apartments and industrial spaces but has completely crossed over into mainstream kitchen design.
This style works in modern industrial kitchens, eclectic spaces, and even as a contrast element in more traditional kitchens where you want one bold design statement. The hardware is intentionally structural, which reads as confident and design-forward rather than utilitarian.
It’s also very DIY-friendly. Pipe shelf kits are widely available, and because the pipes thread together mechanically, installation is more forgiving than concealed bracket systems. You can also adjust the shelf height more easily if you decide you want a different layout later.
8. Styled Open Shelves Above the Counter (The Instagram Look)
This is the specific look that goes viral: open shelves mounted just above the counter level — lower than standard upper cabinet placement — with carefully layered objects at different heights. A cutting board leaned against the wall. A small cluster of canisters in coordinating tones. A trailing pothos plant. A cookbook open to a beautiful page.
It’s more decor than storage, honestly. But in a kitchen where you have adequate closed storage elsewhere, dedicating one section of wall to this kind of intentional, art-like display is completely valid. It turns a plain wall into a focal point and photographs beautifully — which matters if your home is listed on Airbnb or you’re going for a certain aesthetic.
How to Actually Style Kitchen Open Shelves (Without It Looking Like a Store Display or a Mess)
Styling is where most people go wrong. They either over-think it into something stiff and fake-looking, or they under-think it and end up with visual chaos. Here’s the system I use.
Start with a Color Palette
Before anything goes on the shelf, decide on two to three colors. Mine is almost always: white/cream, natural wood, and one accent color (usually green from plants, or the warm terracotta tones of my Le Creuset). Every item on the shelf should fall within that palette.
This single decision — committing to a palette and sticking to it — is the difference between shelves that look professionally styled and shelves that look like a collection of things that happened to end up in the kitchen.
The Rule of Three
Group items in odd numbers. Three items per cluster looks more natural to the eye than two or four. A tall canister, a medium jar, and a small bowl. A cookbook, a cutting board, and a small plant. Three white plates stacked differently than the ones next to them. The brain reads odd-number groupings as organic rather than arranged.
Even Homes & Gardens recommends keeping open shelving carefully edited — what you display is what defines the whole room.
Vary Height and Texture
Flat rows of same-height items read as a shelf at a grocery store. What reads as styled decor is variation: something tall at the back (a vase, a bottle, a tall glass), something medium in the middle (a bowl, a jar, a small cutting board), something low at the front (a single piece of fruit, a small dish, a plant in a low pot).
Add texture variation too. Smooth ceramic next to rough wood next to glass creates visual interest that keeps the eye moving.
Leave Breathing Room
This is the rule most people violate. Shelves don’t need to be full. In fact, 20-30% empty space is what separates styled from cluttered. If every inch of your shelf is covered with things, it reads as storage. If there’s space between groups of objects, it reads as intention.
Resist the urge to fill gaps immediately. Let them breathe.
Layer Items
Don’t place everything flat against the wall in a single row. Lean things: a cookbook open to a beautiful spread, a cutting board angled against the back wall, a framed piece of simple art. Objects at different depths create a three-dimensional quality that flat arrangements can’t match.
What Materials Actually Hold Up for Kitchen Open Shelving
Solid Wood (Best for Warmth and Longevity)
Oak, walnut, pine, maple, cherry — solid wood shelves look the best and last the longest, but they’re the most expensive option. Expect to pay $40-80 per shelf depending on size and species. Seal with a food-safe oil or polyurethane finish to protect against kitchen moisture and grease.
White oak is having a major moment right now and for good reason — it has a beautiful grain pattern, takes both light and dark stains well, and works in both modern and traditional kitchens.
Reclaimed Wood (Best for Farmhouse / Rustic)
Reclaimed wood is any lumber that was previously used and shows its history: saw marks, old nail holes, weathered texture. It adds authenticity to farmhouse-style shelves that new lumber simply can’t replicate. Heavier than new wood and more variable in thickness, so plan your bracket system accordingly.
MDF with Paint Finish (Best Budget Option)
Medium-density fiberboard painted in the same color as your walls or in a contrasting shade is an excellent budget-friendly option. It’s smooth, takes paint perfectly, and can look very high-end when painted white or off-white. The weakness: MDF doesn’t tolerate moisture well. Keep it away from the sink area and seal the edges properly.
Wood-Look Floating Shelves (Affordable Mid-Range)
Many big-box home stores carry floating shelf kits — a hollow shelf casing with internal wall mount hardware included — in wood-look finishes. These aren’t solid wood, but they’re not trying to be. They install in 20 minutes, look clean and modern, and cost $30-60 each. For a rental or first-home scenario, these are extremely practical. They’re also much lighter than solid wood, which is easier on walls.
Maintenance Reality: What to Actually Expect
Let’s be straight about this because the “open shelves are high maintenance” concern gets both overblown AND dismissed, depending on who you ask.
Here’s what I’ve found across four different kitchen setups:
Near the stove (within 3 feet): Wipe down weekly minimum. Grease does travel through the air when you cook, especially if you sauté frequently or cook at high heat without covering pans. Everything in this zone needs regular attention.
Away from the stove: Once every 2-3 weeks is realistic for a light dust and wipe. Not burdensome.
The items themselves: Dishes and glasses that you actually use daily essentially self-clean because they’re cycling through the dishwasher regularly. The things that collect the most grime are the items you rarely touch — decorative pieces, cookbooks, vases. Either use them or move them somewhere else.
My practical suggestion: Keep a small spray bottle of diluted dish soap and a microfiber cloth on or near the shelves. Wipe things down while you’re waiting for water to boil or the coffee to brew. Make it a 2-minute thing, not a project.
If you can’t see yourself doing that — genuinely — open shelving in a cooking kitchen might not be your best choice. That’s an honest answer.
Open Shelving in a Rental Kitchen: What’s Possible
If you’re renting, you have more options than you probably think. And more constraints than you’d like.
What you can typically do without permission:
- Install shelves using Command strips or adhesive hooks for lightweight items (spice jars, small decorative objects)
- Use freestanding shelving units that don’t touch the walls
- Add tension rod shelves inside cabinet openings
What requires a conversation with your landlord:
- Any wall-mounted shelving that requires drilling (even small holes)
- Removing or hiding existing cabinet doors
Many landlords will approve shelf installation if you explain you’ll patch the holes when you leave. It’s worth asking. The worst they can say is no, and then you work with freestanding options.
A freestanding baker’s rack or open metal shelving unit can provide the same visual effect as wall-mounted shelves and goes with you when you move. This pairs well with the no-drill decorating strategies in how to decorate a rental apartment on a budget.
When to Skip Open Shelving (Seriously)
Not every kitchen is a good candidate, and it’s worth being honest about this.
Skip open shelving if:
- Your household produces a high volume of kitchen mess and you know realistically that you won’t keep things tidy
- You have young children who reach the shelf height and will rearrange or knock things over constantly
- Your kitchen ventilation is poor and cooking produces significant smoke or steam (everything on the shelves will require constant cleaning)
- You genuinely don’t enjoy styling and organizing — if the thought of maintaining a “curated” shelf sounds exhausting, it will be
- You’re maximizing storage in a small kitchen where every cubic inch of cabinet space is genuinely needed
In these situations, your cabinets are working correctly. The visual appeal of open shelving isn’t worth the functional compromise.
You’re a great candidate if:
- You already keep a tidy kitchen naturally
- You have attractive dishware you’d enjoy displaying
- You have some closed storage elsewhere for items you’d rather hide
- You enjoy the decorating aspect and would find shelf-styling genuinely satisfying rather than burdensome
Products That Work Well for Kitchen Open Shelves
As an affiliate partner, I may earn a small commission on purchases — at no extra cost to you. I only recommend items I’d use myself.
For floating shelves with a clean, modern look, IKEA’s BOAXEL and BERGSHULT shelf systems offer excellent quality-to-price ratios with multiple size options. These are among the most-installed kitchen shelves in apartments everywhere, and there’s a reason for that — they’re clean, sturdy, and come in white and wood tones that work in almost any kitchen.
If you want a premium solid wood option, look for wall-mounted floating shelves in white oak or pine on Amazon — search for shelves with concealed bracket systems and at minimum 300-pound weight ratings per shelf. Read the reviews specifically for installation feedback; quality varies a lot in this category and the reviews will tell you which brackets actually hold.
For styling, a few things make a consistent difference: matching ceramic canisters in neutral tones (the matte white or linen-colored sets always look more intentional than mixed containers), a small terra cotta planter for herbs, and a couple of vintage wooden cutting boards of different sizes to lean against the back wall for texture.
Pro Tips That Most Beginners Miss
Mount at the right height. Standard upper cabinet height is 18 inches above the counter. Open shelves look best at the same height or slightly lower — 15-18 inches above the counter for the first shelf, with subsequent shelves spaced 10-14 inches apart. Too high and the shelves feel disconnected from the counter. Too low and you lose visual breathing room.
Secure to studs, always. For shelves that will hold actual dishes — not just decorative objects — always mount into wall studs or use heavy-duty toggle anchors rated for the weight. A shelf that fails and sends your dishes to the floor is a bad day by any measure.
One kitchen, one shelf material. Mixing wood types and finishes on kitchen shelves almost never works the way people hope. Pick one material and stick to it throughout the kitchen for visual consistency. Your shelves should read as a design decision, not a collection of different attempts.
Consider the sight lines. Before installing, stand in the spots where you spend the most time in your kitchen — at the stove, at the sink, at the counter where you prep food. Look at the wall where the shelves will go from each position. You’ll be looking at these shelves from these angles every day, so make sure they’re positioned where they look good from your actual usage points, not just from the angle of your Pinterest photo.
Your everyday dishes are your best styling tools. Stop thinking you need special “shelf décor” purchases. Your actual white dinner plates, stacked in a neat column, with a small bowl placed in front and a glass or two beside them, looks completely intentional and beautiful. The thing making those Pinterest kitchens look good usually isn’t special objects — it’s editing what’s already there and organizing it with intention.
Common Open Shelving Mistakes (And How to Avoid Them)
Mistake 1: Putting everything on display. The whole point of curated open shelving is that it’s curated. Your chipped cereal bowl, the plastic tupperware collection, the novelty coffee mug from a work Secret Santa — none of that belongs on open shelves. Be ruthless. Only what you’d be happy for a guest to see goes on the shelves.
Mistake 2: Using too many colors. A shelf with red dishes, blue glasses, green canisters, yellow fruit, and a striped dish towel is just a busy mess. Pick your palette before you start and stick to it. Two colors plus wood and white is a very safe formula.
Mistake 3: Neglecting the wall behind the shelves. The wall behind your shelves is part of the display. Painting the wall a contrasting or complementary color — a deep forest green, a warm terracotta, a moody navy — makes the shelves and objects pop. A white shelf against a white wall is fine; a white shelf against a sage green wall is a magazine photo.
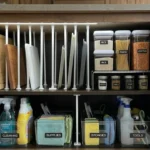
Mistake 4: Installing shelves too close together. Cramped shelves feel claustrophobic. Give each shelf enough vertical clearance that items breathe — at least 10-12 inches between shelves for standard dishware, more if you have tall items. If you’re also looking for clever storage solutions, there’s good inspiration in our guide to how to organize kitchen cabinets on a budget.
Mistake 5: Over-decorating with non-functional items. It’s a kitchen, not a gift shop. One small plant, one or two decorative pieces maximum per shelf section. The majority of what’s displayed should be things you actually use — because that’s what makes an open-shelf kitchen feel lived-in rather than staged.
The Bottom Line
Kitchen open shelving done right is genuinely one of the most impactful, cost-effective design changes you can make. It opens up visual space, forces good organizational habits, and turns everyday dishware into décor without buying anything new.
Done carelessly, it becomes an ongoing maintenance burden that makes your kitchen look messier than it would with doors on the cabinets.
The difference comes down to one question: are you styling a shelf, or are you finding a place to put stuff? If you can commit to the first mindset, open shelving will transform your kitchen. If it’s the second — keep the cabinets, and use the money you’d spend on brackets for something else.
If you’re ready to go for it, start small. Install one set of shelves in one section of your kitchen. Live with it for a month. See how you feel about the maintenance and the styling. If you love it, expand. If you don’t, the holes are small and easy to patch.
That’s a much better plan than ripping out all your upper cabinets at once — and then regretting it.
Pingback: How to Decorate a Small Kitchen on a Budget: 13 Smart Ideas